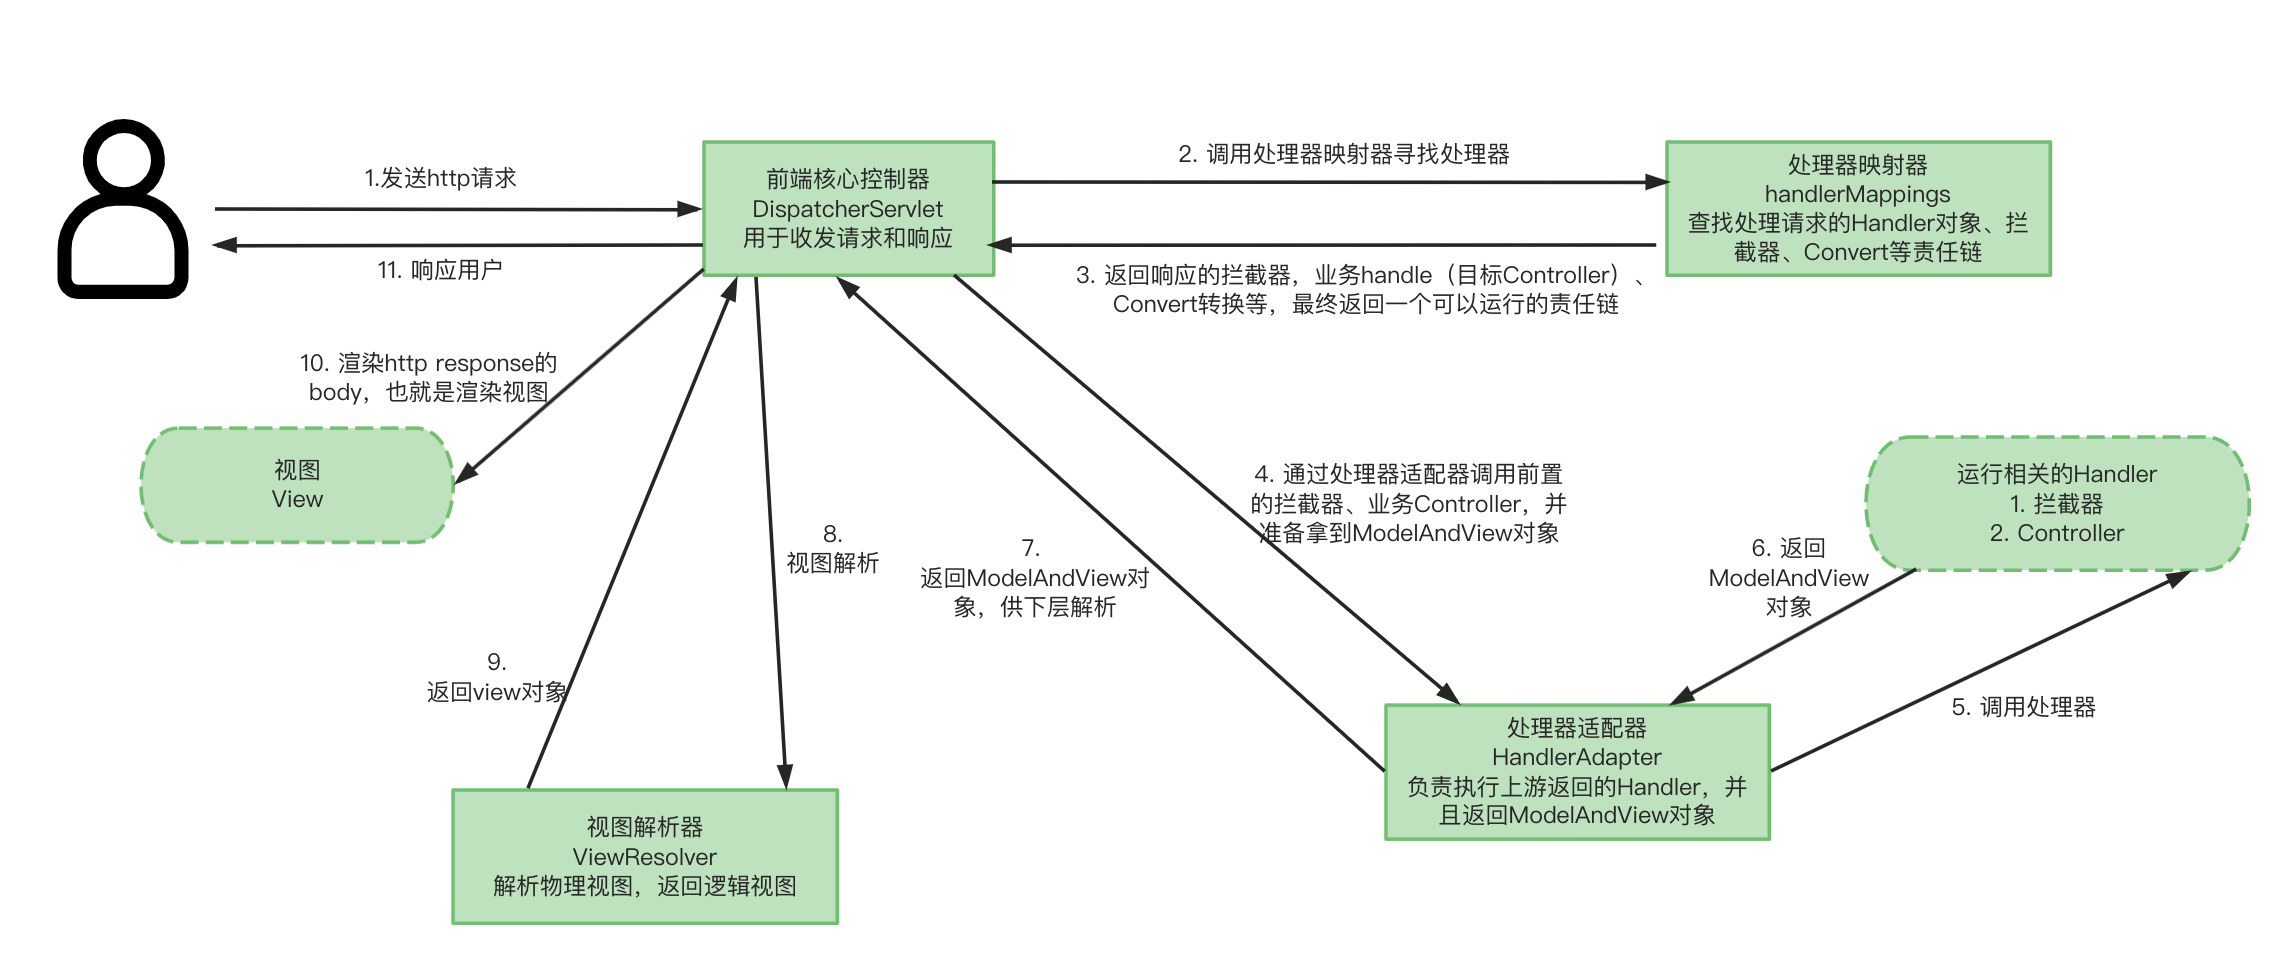
SpringMVC执行过程 流程图 Spring MVC 的四大组件:前端控制器(DispatcherServlet)、处理器映射器(HandlerMapping)、处理器适配器(HandlerAdapter)以及视图解析器(ViewResolver) 的角度来看一下 Spring MVC 对用户请求的处理过程,过程如下图所示:提高了可扩展性和灵活性。
执行过程和组件介绍
用户向服务器发送请求,请求会先达到 SpringMVC 前端控制器 DispatcherServlet ;
DispatcherServlet 根据该 URI,调用 HandlerMapping 获得该 Handler 配置的所有相关的对象(包括 Handler 对象以及 Handler 对象对应的拦截器),最后以 HandlerExecutionChain 执行链对象的形式返回
DispatcherServlet 根据获得的 Handler,获取对应的 HandlerAdapter;
获取到 HandlerAdapter,将开始执行拦截器的 preHandler(…)方法;
提取 Request 中的模型数据,填充 Handler 入参,开始执行 Handler(Controller)方法,处理请求,在填充 Handler 的入参过程中,根据你的配置,Spring 将帮你做一些额外的工作:
HttpMessageConveter:将请求消息(如 Json、xml 等数据)转换成一个对象,将对象转换为指定的类型信息
数据转换:对请求消息进行数据转换。如 String 转换成 Integer、Double 等
数据格式化:对请求消息进行数据格式化。如将字符串转换成格式化数字或格式化日期等
数据验证:验证数据的有效性(长度、格式等),验证结果存储到 BindingResult 或 Error 中
Handler 方法执行完成后,向 DispatcherServlet 返回一个 ModelAndView 对象。
开始执行拦截器的 postHandle(…)方
根据返回的 ModelAndView(此时会判断是否存在异常:如果存在异常,则执行 HandlerExceptionResolver 进行异常处理)选择一个适合的 ViewResolver 进行视图解析,根据 Model 和 View,来渲染视图
渲染视图完毕执行拦截器的 afterCompletion(…)方法
将渲染结果返回给客户端,本次http请求完成
分析源码 准备工作 1. 创建Filter 1 2 3 4 5 6 7 8 @Component public class BaseFilter implements Filter { @Override public void doFilter (ServletRequest servletRequest, ServletResponse servletResponse, FilterChain filterChain) throws IOException, ServletException { System.out.println(this .getClass().getName()+":1" ); filterChain.doFilter(servletRequest, servletResponse); } }
2. 创建HandlerInterceptor��拦截器 1 2 3 4 5 6 7 8 9 10 11 12 13 14 15 16 17 18 19 20 21 @Component public class BaseInterceptor implements HandlerInterceptor , WebMvcConfigurer { @Override public boolean preHandle (HttpServletRequest request, HttpServletResponse response, Object handler) throws Exception { System.out.println(this .getClass().getName()+":2" ); return HandlerInterceptor.super .preHandle(request, response, handler); } @Override public void afterCompletion (HttpServletRequest request, HttpServletResponse response, Object handler, Exception ex) throws Exception { System.out.println(this .getClass().getName()+":4" ); HandlerInterceptor.super .afterCompletion(request, response, handler, ex); } @Override public void addInterceptors (InterceptorRegistry registry) { registry.addInterceptor(new BaseInterceptor ()); } }
3. 编写Controller的代码 1 2 3 4 5 @RequestMapping("index/{message}") public String get (@PathVariable String message) { System.out.println(this .getClass().getName()+":3" ); return "hello" + "<br/>" + message + "<br>" + LocalDateTime.now(); }
开始分析 首先当我们访问页面的时候,将会把请求发送到前端控制器 DispatcherServlet ,DispatcherServlet 是一个 Servlet,我们知道在 Servlet 在处理一个请求的时候会交给 service 方法进行处理,这里也不例外,DispatcherServlet 继承了 FrameworkServlet,并且在收到请求后会调用我们的doService()函数
1. 进入doService(request, response) 1 2 3 4 5 6 7 8 9 10 11 12 13 14 15 16 17 18 19 20 21 22 23 24 25 26 27 28 29 30 31 32 33 34 35 36 37 38 39 40 41 42 43 44 @Override protected void doService (HttpServletRequest request, HttpServletResponse response) throws Exception { logRequest(request); Map<String, Object> attributesSnapshot = null ; if (WebUtils.isIncludeRequest(request)) { attributesSnapshot = new HashMap <>(); Enumeration<?> attrNames = request.getAttributeNames(); while (attrNames.hasMoreElements()) { String attrName = (String) attrNames.nextElement(); if (this .cleanupAfterInclude || attrName.startsWith(DEFAULT_STRATEGIES_PREFIX)) { attributesSnapshot.put(attrName, request.getAttribute(attrName)); } } } request.setAttribute(WEB_APPLICATION_CONTEXT_ATTRIBUTE, getWebApplicationContext()); request.setAttribute(LOCALE_RESOLVER_ATTRIBUTE, this .localeResolver); request.setAttribute(THEME_RESOLVER_ATTRIBUTE, this .themeResolver); request.setAttribute(THEME_SOURCE_ATTRIBUTE, getThemeSource()); if (this .flashMapManager != null ) { FlashMap inputFlashMap = this .flashMapManager.retrieveAndUpdate(request, response); if (inputFlashMap != null ) { request.setAttribute(INPUT_FLASH_MAP_ATTRIBUTE, Collections.unmodifiableMap(inputFlashMap)); } request.setAttribute(OUTPUT_FLASH_MAP_ATTRIBUTE, new FlashMap ()); request.setAttribute(FLASH_MAP_MANAGER_ATTRIBUTE, this .flashMapManager); } try { doDispatch(request, response); } finally { if (!WebAsyncUtils.getAsyncManager(request).isConcurrentHandlingStarted()) { if (attributesSnapshot != null ) { restoreAttributesAfterInclude(request, attributesSnapshot); } } } }
2. doDispatch(request, response)真正开始处理请求 接下来 DispatcherServlet 开始真正的处理,让我们来看下 doDispatch 方法,首先会获取当前请求的 Handler 执行链 ,然后找到合适的 HandlerAdapter (此处为 RequestMappingHandlerAdapter),接着调用 RequestMappingHandlerAdapter 的 handle 方法,如下为 doDispatch 方法:
1 2 3 4 5 6 7 8 9 10 11 12 13 14 15 16 17 18 19 20 21 22 23 24 25 26 27 28 29 30 31 32 33 34 35 36 37 38 39 40 41 42 43 44 45 46 47 48 49 50 51 52 53 54 55 56 57 58 59 60 61 62 63 64 65 66 67 68 69 70 71 72 73 74 75 76 77 78 79 80 81 82 83 84 protected void doDispatch (HttpServletRequest request, HttpServletResponse response) throws Exception { HttpServletRequest processedRequest = request; HandlerExecutionChain mappedHandler = null ; boolean multipartRequestParsed = false ; WebAsyncManager asyncManager = WebAsyncUtils.getAsyncManager(request); try { ModelAndView mv = null ; Exception dispatchException = null ; try { processedRequest = checkMultipart(request); multipartRequestParsed = (processedRequest != request); mappedHandler = getHandler(processedRequest); if (mappedHandler == null ) { noHandlerFound(processedRequest, response); return ; } HandlerAdapter ha = getHandlerAdapter(mappedHandler.getHandler()); String method = request.getMethod(); boolean isGet = "GET" .equals(method); if (isGet || "HEAD" .equals(method)) { long lastModified = ha.getLastModified(request, mappedHandler.getHandler()); if (new ServletWebRequest (request, response).checkNotModified(lastModified) && isGet) { return ; } } if (!mappedHandler.applyPreHandle(processedRequest, response)) { return ; } mv = ha.handle(processedRequest, response, mappedHandler.getHandler()); if (asyncManager.isConcurrentHandlingStarted()) { return ; } applyDefaultViewName(processedRequest, mv); mappedHandler.applyPostHandle(processedRequest, response, mv); } catch (Exception ex) { dispatchException = ex; } catch (Throwable err) { dispatchException = new NestedServletException ("Handler dispatch failed" , err); } processDispatchResult(processedRequest, response, mappedHandler, mv, dispatchException); } catch (Exception ex) { triggerAfterCompletion(processedRequest, response, mappedHandler, ex); } catch (Throwable err) { triggerAfterCompletion(processedRequest, response, mappedHandler, new NestedServletException ("Handler processing failed" , err)); } finally { if (asyncManager.isConcurrentHandlingStarted()) { if (mappedHandler != null ) { mappedHandler.applyAfterConcurrentHandlingStarted(processedRequest, response); } } else { if (multipartRequestParsed) { cleanupMultipart(processedRequest); } } } }
3. 查找对应的 Handler 对象 getHandler(processedRequest) 让我们去探索下是如何获取当前请求的 Handler 执行链,对应着这句代码 mappedHandler = getHandler(processedRequest);,看下 DispatcherServlet 具体的 getHandler 方法,该方法主要是遍历所有的 handlerMappings 进行处理,handlerMappings 是在启动的时候预先注册好的,handlerMappings 包含 RequestMappingHandlerMapping、BeanNameUrlHandlerMapping、RouterFunctionMapping、SimpleUrlHandlerMapping 以及 WelcomePageHandlerMapping,在循环中会调用 AbstractHandlerMapping 类中的 getHandler 方法 来获取 Handler 执行链,若获取的 Handler 执行链不为 null,则返回当前请求的 Handler 执行链,DispatcherServlet 类的 getHandler 方法如下:
1 2 3 4 5 6 7 8 9 10 11 12 13 @Nullable protected HandlerExecutionChain getHandler (HttpServletRequest request) throws Exception { if (this .handlerMappings != null ) { for (HandlerMapping mapping : this .handlerMappings) { HandlerExecutionChain handler = mapping.getHandler(request); if (handler != null ) { return handler; } } } return null ; }
3.1 在循环中,根据 mapping.getHandler(request);,继续往下看 AbstractHandlerMapping 类中的 getHandler 方法: 1 2 3 4 5 6 7 8 9 10 11 12 13 14 15 16 17 18 public final HandlerExecutionChain getHandler (HttpServletRequest request) throws Exception { Object handler = getHandlerInternal(request); if (handler == null ) { handler = getDefaultHandler(); } if (handler == null ) { return null ; } if (handler instanceof String) { String handlerName = (String) handler; handler = obtainApplicationContext().getBean(handlerName); } HandlerExecutionChain executionChain = getHandlerExecutionChain(handler, request); return executionChain;
3.2 getHandlerInternal(request) AbstractHandlerMapping 类中的 getHandler 方法中首先根据 requrst 获取 handler ,主要是调用了 AbstractHandlerMethodMapping 类中的 getHandlerInternal 方法,该方法首先获取 request 中的 url,即 /hello/{message},用来匹配 handler 并封装成 HandlerMethod,然后根据 handlerMethod 中的 bean 来实例化 Handler 并返回。
1 2 3 4 5 6 7 8 9 10 11 12 13 14 @Override protected HandlerMethod getHandlerInternal (HttpServletRequest request) throws Exception { String lookupPath = getUrlPathHelper().getLookupPathForRequest(request); this .mappingRegistry.acquireReadLock(); try { HandlerMethod handlerMethod = lookupHandlerMethod(lookupPath, request); return (handlerMethod != null ? handlerMethod.createWithResolvedBean() : null ); } finally { this .mappingRegistry.releaseReadLock(); } }
接下来,我们看 lookupHandlerMethod 的逻辑,主要逻辑委托给了 mappingRegistry 这个成员变量来处理:
1 2 3 4 5 6 7 8 9 10 11 12 13 14 15 16 17 18 19 20 21 22 23 24 25 26 27 28 29 30 31 32 33 34 35 36 37 38 39 40 41 42 43 44 45 46 47 48 @Nullable protected HandlerMethod lookupHandlerMethod (String lookupPath, HttpServletRequest request) throws Exception { List<Match> matches = new ArrayList <>(); List<T> directPathMatches = this .mappingRegistry.getMappingsByUrl(lookupPath); if (directPathMatches != null ) { addMatchingMappings(directPathMatches, matches, request); } if (matches.isEmpty()) { addMatchingMappings(this .mappingRegistry.getMappings().keySet(), matches, request); } if (!matches.isEmpty()) { Comparator<Match> comparator = new MatchComparator (getMappingComparator(request)); matches.sort(comparator); Match bestMatch = matches.get(0 ); if (matches.size() > 1 ) { if (logger.isTraceEnabled()) { logger.trace(matches.size() + " matching mappings: " + matches); } if (CorsUtils.isPreFlightRequest(request)) { return PREFLIGHT_AMBIGUOUS_MATCH; } Match secondBestMatch = matches.get(1 ); if (comparator.compare(bestMatch, secondBestMatch) == 0 ) { Method m1 = bestMatch.handlerMethod.getMethod(); Method m2 = secondBestMatch.handlerMethod.getMethod(); String uri = request.getRequestURI(); throw new IllegalStateException ( "Ambiguous handler methods mapped for '" + uri + "': {" + m1 + ", " + m2 + "}" ); } } request.setAttribute(BEST_MATCHING_HANDLER_ATTRIBUTE, bestMatch.handlerMethod); handleMatch(bestMatch.mapping, lookupPath, request); return bestMatch.handlerMethod; } else { return handleNoMatch(this .mappingRegistry.getMappings().keySet(), lookupPath, request); } }
通过上面的过程,我们就获取到了 Handler,就开始封装执行链 了,就是将我们配置的拦截器加入到执行链中去,getHandlerExecutionChain 方法如下:
3.3 (封装执行链、重要) getHandlerExecutionChain�() 这里会传入业务的handler,也就是我们的业务controller。或者是以beanName生成的Handlermappings,反正就是具体的业务方法,然后把拦截器放在执行链的前面就可以
1 2 3 4 5 6 7 8 9 10 11 12 13 14 15 16 17 18 19 20 21 protected HandlerExecutionChain getHandlerExecutionChain (Object handler, HttpServletRequest request) { HandlerExecutionChain chain = (handler instanceof HandlerExecutionChain ? (HandlerExecutionChain) handler : new HandlerExecutionChain (handler)); String lookupPath = this .urlPathHelper.getLookupPathForRequest(request); for (HandlerInterceptor interceptor : this .adaptedInterceptors) { if (interceptor instanceof MappedInterceptor) { MappedInterceptor mappedInterceptor = (MappedInterceptor) interceptor; if (mappedInterceptor.matches(lookupPath, this .pathMatcher)) { chain.addInterceptor(mappedInterceptor.getInterceptor()); } } else { chain.addInterceptor(interceptor); } } return chain; }
到此为止,我们就获取了当前请求的 Handler 执行链,接下来看下是如何获取请求的 Handler 适配器 ,主要依靠 DispatcherServlet 类的 getHandlerAdapter 方法 ,该方法就是遍历所有的 HandlerAdapter,找到和当前 Handler 匹配的就返回,在这里匹配到的为 RequestMappingHandlerAdapter。DispatcherServlet 类的 getHandlerAdapter 方法如下:
1 2 3 4 5 6 7 8 9 10 11 12 protected HandlerAdapter getHandlerAdapter (Object handler) throws ServletException { if (this .handlerAdapters != null ) { for (HandlerAdapter adapter : this .handlerAdapters) { if (adapter.supports(handler)) { return adapter; } } } throw new ServletException ("No adapter for handler [" + handler + "]: The DispatcherServlet configuration needs to include a HandlerAdapter that supports this handler" ); }
4. (调用业务)HandlerAdapter 执行当前的 Handler 再获取完当前请求的 Handler 适配器后,接着进行缓存处理 ,也就是对 last-modified 的处理,然后调用 applyPreHandle 方法执行拦截器的 preHandle 方法 ,即遍历所有定义的 interceptor,执行 postHandle 方法,然后就到了实际执行 handle 的地方,doDispatch 方法中 handle 方法是执行当前 Handler,我们这里使用的是 RequestMappingHandlerAdapter,首先会进入 AbstractHandlerMethodAdapter 的 handle 方法 :
1 2 3 4 5 6 7 8 @Override @Nullable public final ModelAndView handle (HttpServletRequest request, HttpServletResponse response, Object handler) throws Exception { return handleInternal(request, response, (HandlerMethod) handler); }
4.1 AbstractHandlerMethodAdapter 的 handle 方法中又调用了 RequestMappingHandlerAdapter 类的 handleInternal 方法: 1 2 3 4 5 6 7 8 9 10 11 12 13 14 15 16 17 18 19 20 21 22 23 24 25 26 27 28 29 30 31 32 33 34 35 36 37 @Override protected ModelAndView handleInternal (HttpServletRequest request, HttpServletResponse response, HandlerMethod handlerMethod) throws Exception { ModelAndView mav; checkRequest(request); if (this .synchronizeOnSession) { HttpSession session = request.getSession(false ); if (session != null ) { Object mutex = WebUtils.getSessionMutex(session); synchronized (mutex) { mav = invokeHandlerMethod(request, response, handlerMethod); } } else { mav = invokeHandlerMethod(request, response, handlerMethod); } } else { mav = invokeHandlerMethod(request, response, handlerMethod); } if (!response.containsHeader(HEADER_CACHE_CONTROL)) { if (getSessionAttributesHandler(handlerMethod).hasSessionAttributes()) { applyCacheSeconds(response, this .cacheSecondsForSessionAttributeHandlers); } else { prepareResponse(response); } } return mav; }
在执行完 handle 方法后,然后调用 applyDefaultViewName 方法组装默认视图名称 ,将前缀和后缀名都加上,接着调用 applyPostHandle 方法执行拦截器的 preHandle 方法 ,也就是遍历所有定义的 interceptor,执行 postHandle 方法。
5. 处理最终结果以及渲染 最后调用 DispatcherServlet 类中的 processDispatchResult 方法 ,此方法是处理最终结果的,包括异常处理、渲染页面和发出完成通知触发拦截器的 afterCompletion() 方法执行等 ,processDispatchResult()方法代码如下:
1 2 3 4 5 6 7 8 9 10 11 12 13 14 15 16 17 18 19 20 21 22 23 24 25 26 27 28 29 30 31 32 33 34 35 36 37 38 39 40 private void processDispatchResult (HttpServletRequest request, HttpServletResponse response, @Nullable HandlerExecutionChain mappedHandler, @Nullable ModelAndView mv, @Nullable Exception exception) throws Exception { boolean errorView = false ; if (exception != null ) { if (exception instanceof ModelAndViewDefiningException) { logger.debug("ModelAndViewDefiningException encountered" , exception); mv = ((ModelAndViewDefiningException) exception).getModelAndView(); } else { Object handler = (mappedHandler != null ? mappedHandler.getHandler() : null ); mv = processHandlerException(request, response, handler, exception); errorView = (mv != null ); } } if (mv != null && !mv.wasCleared()) { render(mv, request, response); if (errorView) { WebUtils.clearErrorRequestAttributes(request); } } else { if (logger.isTraceEnabled()) { logger.trace("No view rendering, null ModelAndView returned." ); } } if (WebAsyncUtils.getAsyncManager(request).isConcurrentHandlingStarted()) { return ; } if (mappedHandler != null ) { mappedHandler.triggerAfterCompletion(request, response, null ); } }
接下来让我们看下 DispatcherServlet 类的 render 方法 是如何完成渲染的,DispatcherServlet 类的 render 方法渲染过程如下:
判断 ModelAndView 中 view 是否为 view name,没有获取其实例对象:如果是根据 name,如果是则需要调用 resolveViewName 从视图解析器获取对应的视图(View)对象;否则 ModelAndView 中使用 getview 方法获取 view 对象。
然后调用 View 类的 render 方法。
DispatcherServlet 类的 render 方法如下:
1 2 3 4 5 6 7 8 9 10 11 12 13 14 15 16 17 18 19 20 21 22 23 24 25 26 27 28 29 30 31 32 33 34 35 36 37 38 39 protected void render (ModelAndView mv, HttpServletRequest request, HttpServletResponse response) throws Exception { Locale locale = (this .localeResolver != null ? this .localeResolver.resolveLocale(request) : request.getLocale()); response.setLocale(locale); View view; String viewName = mv.getViewName(); if (viewName != null ) { view = resolveViewName(viewName, mv.getModelInternal(), locale, request); if (view == null ) { throw new ServletException ("Could not resolve view with name '" + mv.getViewName() + "' in servlet with name '" + getServletName() + "'" ); } } else { view = mv.getView(); if (view == null ) { throw new ServletException ("ModelAndView [" + mv + "] neither contains a view name nor a " + "View object in servlet with name '" + getServletName() + "'" ); } } if (logger.isTraceEnabled()) { logger.trace("Rendering view [" + view + "] " ); } try { if (mv.getStatus() != null ) { response.setStatus(mv.getStatus().value()); } view.render(mv.getModelInternal(), request, response); } catch (Exception ex) { if (logger.isDebugEnabled()) { logger.debug("Error rendering view [" + view + "]" , ex); } throw ex; } }